You can receive your new CA certificate in a few different formats from the CA provider.
The sections below outline the required OpenSSL steps for each format.
CER or CRT to PEM conversion steps
Extract the Public Certificate
Run the following OpenSSL Command:
×509 -inform DER -in "path to your cert.crt" -out "path to your public cert.pem"
The result will be your "pem" (Public Certificate.pem) file that will be imported into Anaplan using Anaplan's Tenant Administrator client.
Your "Public Certificate.pem" file can be paired with the previously generated Private Key/Password from the CSR process.
Note: This is the same command to use for the "cer" format. Be sure to replace "path to your cert.crt" with "path to your cert.cer" file instead.
We will now open the resulting "Public Certificate.pem" file in a text editor to edit the contents.
Edit the "Public Certificate.pem" file for API use
Once the new ".pem" file has been extracted from the CA Certificate that you received from the CA Provider, you will need to open the "Public Certificate.pem" file in a text editor.
1. Remove any content before "-----BEGIN CERTIFICATE-----section.
Note: Do not remove the certificate content between the "-----BEGIN CERTIFICATE-----" or after "-----END CERTIFICATE-----" lines.
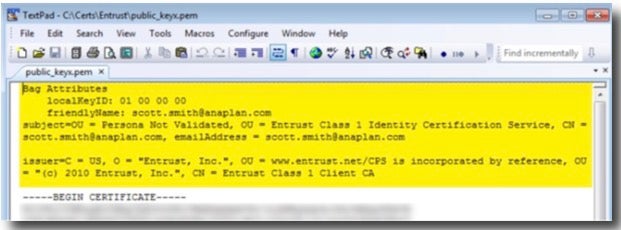
2. Cut each certificate string that appears after the first "-----BEGIN CERTIFICATE-----" and " -----END CERTIFICATE-----" entry.
Paste the cut certificate strings into a separate text file and save the file as "Additional Certificate Strings" in case these are needed in place of the certificate string that we left in the "Public Certificate pem" file.
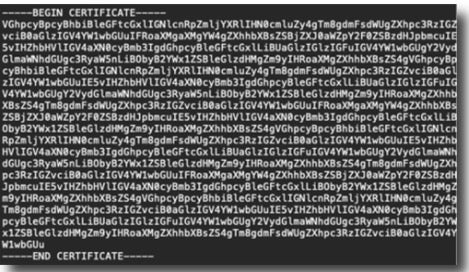
3. Save the file. Your "Public Certificate.pem" file should look like this:
4. Save the "Public Certificate.pem" file and move on to the Implementation Process steps.
PFX or P12 to PEM conversion steps
The ".pfx" or ".p12" format contains the server certificate, intermediate certificates, and the private key in one encrypted file.
1. Extract the public certificate
Run the following OpenSSL command:
pkcs12 -in "path to your cert.p12" -nokeys -out "path to your new cert.psm"
The result will be your ".pem" (Public Certificate.pem) file that will be imported into Anaplan using Anaplan's Tenant Adminstrator client.
Note: This is the same command to use for the ".pfx" format. Be sure to replace the "path to your cert.p12" with "path to your cert.pfx" file instead.
2. Extract the Private Key
There's an option to either extract an Unencrypted Private Key or an Encrypted Private Key.
Unencrypted Private Key
Use of an Unencrypted Private Key won't require you to share your Private Key Passphrase in plain text within an Anaplan Connect script.
To extract an Unencrypted Private Key, run the following OpenSSL command:
pkcs12 -in "path to your p12 cert.p12" -nocerts -out "path to your private key.psm" - nodes
(This will create a "Private Key.pem" file that won't require the use of a password while running your API integrations.)
You'll be prompted to enter a password for the Private Key. It will also ask to confirm that password.
Encrypted Private Key
Use of an Encrypted Private Key will require an additional OpenSSL command and the inclusion of your Private Key Passphrase in plain text within an Anaplan Connect script.
To extract an Encrypted Private Key, run the following OpenSSL command:
pkcs12 -in "path to your p12 cert.p12" -nocerts -out "path to your private key.psm"
(This will create a Private Key file that will require a password when running your API integrations.)
This password or "passphrase" will be presented in plain text within your Anaplan Connect scripts. If you'd rather not present the Private Key passphrase in your scripts, an Unencrypted Private Key may be a better option.
For an Encrypted Private Key to be used in Anaplan Connect, the file must be converted to PKCS8 (PEM) format. The OpenSSL command below will convert that file:
pkcs8 -inform PEM -in "path to your private key.pem" -outperform PEM -out "path to pkcs8 formatted private key file.pem" -passout pass:pkcs8 file password
You'll be prompted to create a new password (passphrase) for your Encrypted Private Key. Be sure to keep track of this password as it will be needed in our API implementation steps.
You can open and edit the resulting "Public Certificate.pem" file in a text editor.
How to edit the "Public Certificate.pem" file for API use
Once the new ".pem" file has been extracted from the CA Certificate that you received from the CA Provider, you will need to open the "Public Certificate.pem" file in a text editor.
1. Remove any content before "-----BEGIN CERTIFICATE-----section.
Note: Don't remove the certificate content between the "-----BEGIN CERTIFICATE-----" or after "-----END CERTIFICATE-----" lines.
2. Cut each certificate string that appears after the first "-----BEGIN CERTIFICATE-----" and " -----END CERTIFICATE-----" entry.
Paste the cut certificate strings into a separate text file and save the file as "Additional Certificate Strings" in case these are needed in place of the certificate string that we left in the "Public Certificate pem" file.
3. Save the file. Your "Public Certificate.pem" file should look like this:
4. Save the "Public Certificate.pem" file and move on to the Implementation Process steps.
P7B to PEM conversion steps
To extract the Public Certificate, run the following OpenSSL command:
pkcs7 -print_certs -in "path to your cert.p7b" -out "path to your public cert.pem"
The result will be your ".pem" (Public Certificate.pem) file that will be imported into Anaplan using Anaplan's Tenant Adminstrator client.
Your "Public Certificate.pem" file can be paired with the previously generated Private Key/Password from the CSR process.
You can open and edit the resulting "Public Certificate.pem" file in a text editor.
How to edit the "Public Certificate.pem" file for API use
Once the new ".pem" file has been extracted from the CA Certificate that you received from the CA Provider, you will need to open the "Public Certificate.pem" file in a text editor.
1. Remove any content before "-----BEGIN CERTIFICATE-----section.
Note: Do not remove the certificate content between the "-----BEGIN CERTIFICATE-----" or after "-----END CERTIFICATE-----" lines.
2. Cut each certificate string that appears after the first "-----BEGIN CERTIFICATE-----" and " -----END CERTIFICATE-----" entry.
Paste the cut certificate strings into a separate text file and save the file as "Additional Certificate Strings" in case these are needed in place of the certificate string that we left in the "Public Certificate pem" file.
3. Save the file. Your "Public Certificate.pem" file should look like this:
4. Save the "Public Certificate.pem" file and move on to the Implementation Process steps.

